
Cloudy Day Photography | 8 Actionable tips for Photography On A Cloudy Day
Cloudy day photography isn’t something many of us plan for. Many of our best shots often come in more favourable conditions. But the harsh reality is often Mother Nature has other plans…
That majestic sunrise you dreamed of can turn in to a reality of low cloud and drizzle, often rapidly and unexpectedly.
Living in the UK, I’ve experienced this a lot! Even during the more favourable months of the year, us Brits are often subject to the changing weather of the British Summertime.
Showers, wind, and vast amounts of cloud can all be common even during the best months.
So as a photographer what options do you have when the cloud rolls in? After the detailed planning and travelling, should you just give up and call it a day?
Cloudy day photography can be challenging, but many of you may be surprised to know that you can still get some great shots, even during the worst conditions.
So, before you pack up your gear and head home, read on, as we share our top tips for Cloudy Day Landscape Photography.
Is A Cloudy Day Good For Taking Pictures?
Like many photographers, my favourite shots in my portfolio are those taken during the soft light of the golden hour…
There’s simply no better feeling than knowing you’ve made a stunning work of art after being blessed with perfect conditions.
Mother Nature treated me to some perfect conditions on a recent visit to the Lake District. After the sun had set, the sky turned an incredible shade of pink mixed with a rich blue. It was a scene that we dream of as landscape photographers.
I know – I was lucky. We all know people who have made journeys to photograph awesome locations, only for the weather to act up. We’ve all been there ourselves.
So when the landscape photography turns in to cloudy day photography, what are we to do?
Believe it or not, certain styles of photography lend themselves well to cloudy conditions. Great shots are still there to be had even when mother nature isn’t cooperating.
Cloudy Day Photography - An Example Where Clouds Add Drama And Interest

Black and White photography is a great example of a style that lends itself to cloudy day photography.
The contrast of the tones can create epic drama in the sky.
There are also some styles particularly on Social Media which use clouds to great effect. Shots with dull, moody tones have been the rage in certain circles over the last few years, and cloudy conditions help achieve this.
You’ve also got Portrait Photography. Many photographers struggle during the harsh daytime light. This causes challenges due to the high dynamic range. Clouds can help, by acting as a natural light diffuser which can help when shooting portraits.
The best thing about clouds, is they come in all sorts of shapes and sizes and in some situations they can truly make or break a shot. Consider this example…
The above shot is the original. It was taken during the harsh light of day so I opted for Black and White.
As you can see, the sky is clear … not a cloud in sight.
Unfortunately, for me, this ruined the shot. The lack of any clouds creates a lot of negative space in the shot…which I don’t like.
This is the kind of situation where photography on a cloudy day would have worked well.
Clouds would have added some interest to the shot.
Lucky for me photoshop exists! I used the sky replacement feature to add in some cloud I shot on another day.
I think this adds a lot more interest and atmosphere to the shot. It fills the negative space with something interesting and dramatic. See, clouds aren’t always the enemy when trying to get great shots!

As seen in these examples, you most certainly can get great shots on a cloudy day, and clouds are often complementary to a composure.
There are even great shots to be had in the worst of conditions… so make sure you stick around to there end where we give you 8 actionable tips for photography on a cloudy day.
What's The Best Time Of Day For Cloudy Sky Photography?
Now we’ve established that you can still get great shots with clouds in the sky, what is the best time of day to shoot on a cloudy day?
If you’ve followed some of my articles on finershots, you’ll know that I’m a sucker for Golden Hour shots like many other photographers out there.
So what’s so special about do the Golden Hour?
I’m glad you asked. The sun is low in the sky during the golden hour.
This produces a warm glowing light rather the the intense sunlight experience during the day. This is part of the recipe for truly stunning shots.
But when you add clouds to the mix, the different cloud formations and amount can help create stunning shots which take your shot to the next level.
Due to refraction and a bunch of fancy physics, the light interacts the clouds and creates beautiful colours not seen at other times of day.
It’s for this reason I love to shoot during the golden hour, even if it’s cloudy.
So, what is this mysterious ‘Golden Hour’?
Simply put, it’s the hour surrounding sunrise or sunset. This changes every day of the year, depending on location in the world.
The easiest way to find Golden Hour in your area is to use the PhotoPills app.

Don't Forget The Blue Hour...
Like the Golden Hour, the Blue Hour can be just as good a time for photography on a cloudy day.
So when is it? Blue hour is simply the hour before golden hour in the morning, or after the golden hour in the evening. It’s my favourite time to shoot during overcast conditions.
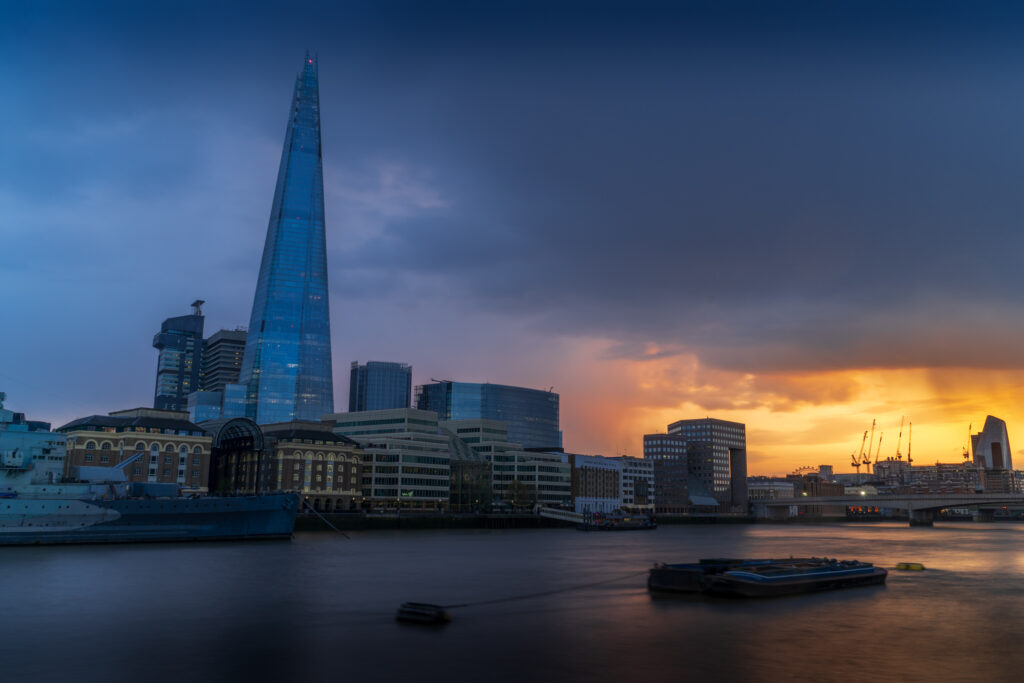
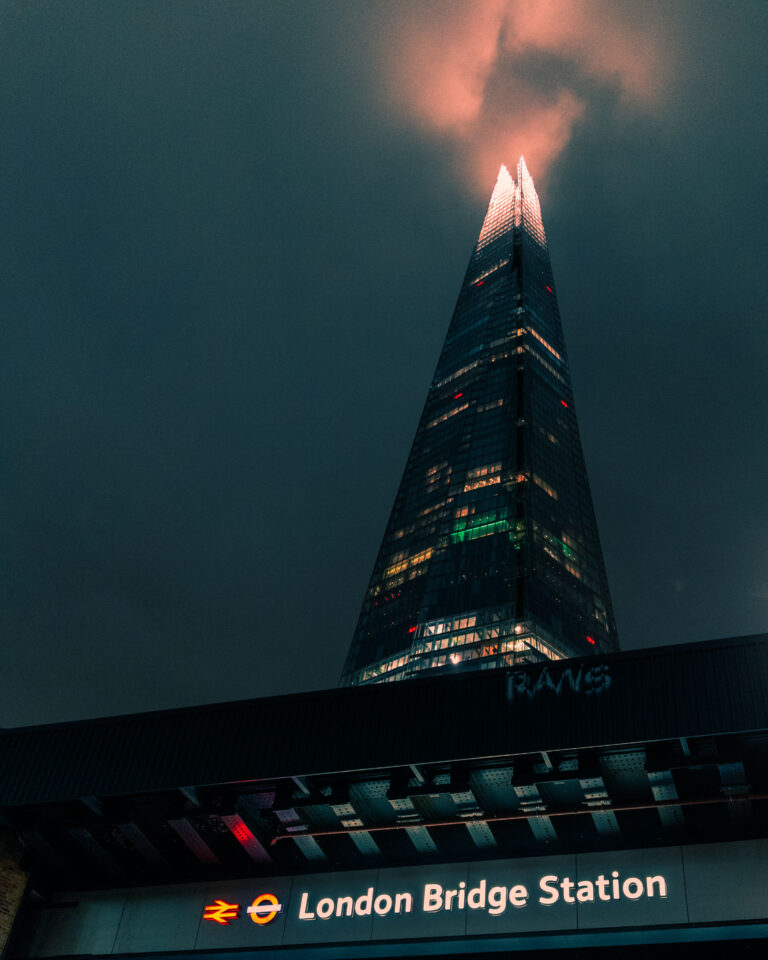
If shooting cityscapes during blue hour on an overcast day, you get a rich warm glow as the city lights reflect off the low cloud.
Shooting near water also often leaves the overcast sky with a cool glow, which instills a sense of calm in the image. The shot above illustrates this well…
The Golden and Blue hours are great to shoot, but there may be times where daylight may be preferable.
One of those situations is when shooting Portrait Photography. The challenge shooting during daylight can be the intense light from the sun, which also creates shadows on the subject.
On a cloudy day, the light can be naturally diffused by the cloud which reduces the intensity of the sunlight.
This may make great conditions for taking portraits, as the light intensity will be reduced, and spread evenly over the subject.
Can You Get Golden Hour On A Cloudy Day?
When shooting cloudy day photography, you still get golden hour as it’s simply a set time during the day.
You often get dramatic sunrises and sunsets during the golden hour especially during different types and levels of cloud cover.
Some cloud types turn to spectacular shades of orange, pink, and red due to Rayleigh Scattering, but this depends on the cloud type and height.
On other days, the cloud layers may be just too thick. Whilst you can still shoot during Golden Hour, the sky will be less interesting and duller, with a blue or grey colour.
You can still get great shots during these conditions.
See our Cloudy Sky Photography Tips section below, for actionable steps to get the best shots no matter what the conditions.
Tips For Cloudy Day Photography
So now we’ve established that you can still take great shots on a cloudy day, here are some top tips for shooting during cloudy conditions.
What Should My Camera Settings Be On A Cloudy Day?
You’ve decided to stick around and get those shots even though the weather isn’t the best. So, how do you best set up your camera for cloudy day photography?
Sit back and pour yourself a coffee, whilst we walk you through the basics. Ahhh.
Like most things in photography it all comes back to the basics, and in this case the exposure triangle.
If you haven’t seen the exposure triangle before, it shows you the factors that make up the overall exposure of an image.
These factors are aperture, ISO and Shutter Speed.
Looking at the exposure triangle, you can see as the aperture decreases, the image gets brighter.
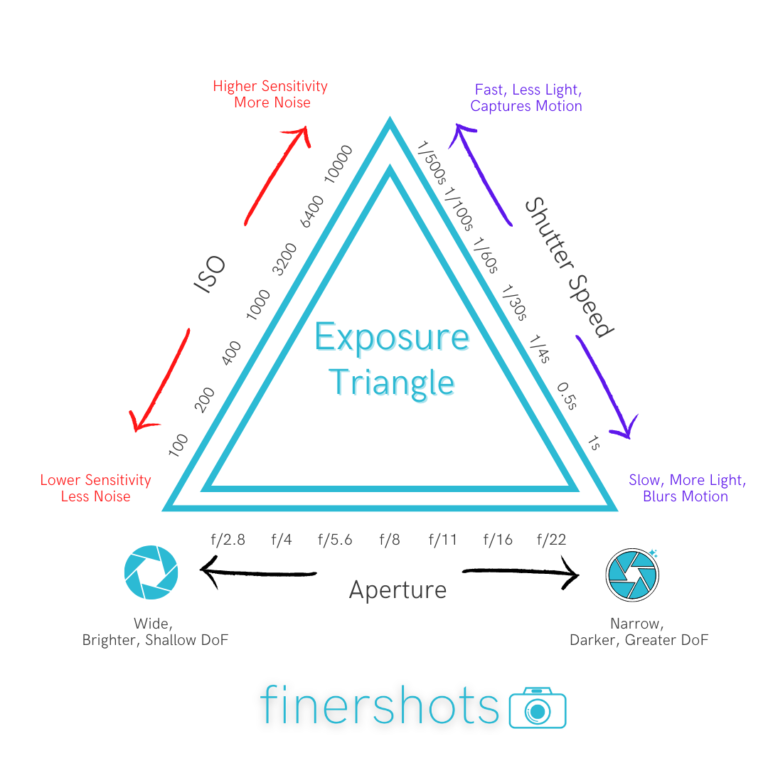
To compensate and keep the correct exposure, you’ll need to either increase the shutter speed (to let in less light) or reduce the ISO.
The settings you’ll need will depend on how much cloud there is, and the ambient light conditions.
For instance, if there is a lot of cloud cover there will be less sunlight to expose the shot. You’ll need to use the principals of the exposure triangle to expose the shot correctly.
This will mean either increasing the ISO, reducing the shutter speed (shutter open longer), or reducing the aperture (wider). Each has its own benefits and downfalls which we’ll explore in a later section.
So how can you tell if your image is correctly exposed?
Using The Histogram To Expose A Shot
Luckily, most modern cameras come with a feature called a histogram. This is what I personally use when shooting to make sure I’ve got a correct exposure.
The graph shows you the luminance levels of either the live view in camera, or a photo that’s been taken.
The left side of the graph represents dark tones, and the right-side light tones. The middle section is the mid tone range. An underexposed shot will have high values towards the left of the graph.
I always shoot with the live readout of the histogram so I can see if the image is exposed properly. Broadly speaking, you’re looking for an even distribution over the entire spectrum of the curve.

You can break this rule in certain situations. For example, on a sunny day I prefer to exposure for the highlights.
That way I know the detail in the sky isn’t lost due to overexposure.
You can bring the detail back in in the shadows in post-production.
If in doubt, you can use bracketing mode to make sure data is captured across the histogram.
Most modern cameras have built in light metering, which is how they create the histogram.
If you’re not using a camera with built in light metering there are some handy rules of thumb you can follow based on the cloud cover.
Grab your notepad as you don’t want to miss these!
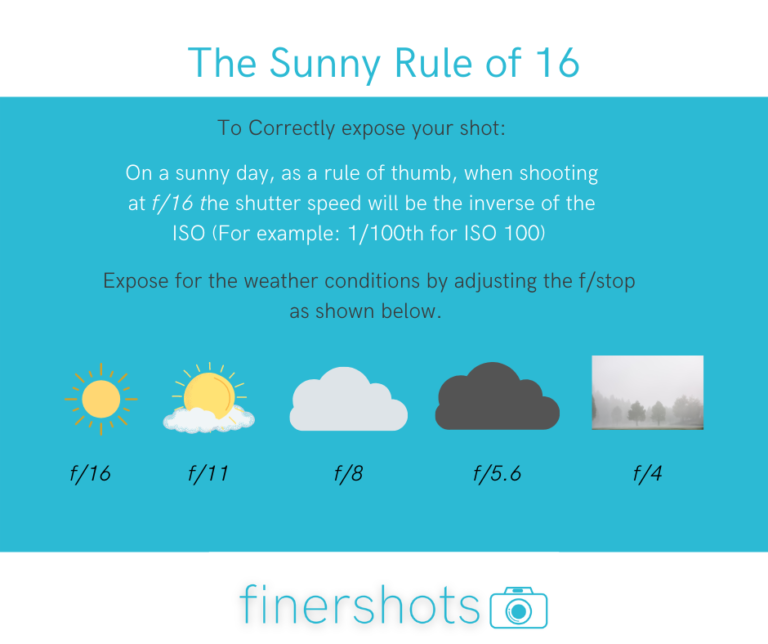
Cloudy Day Photography - The Sunny Rule Of 16
This rule states that if it is sunny, you should shoot at f/16, and go up in stops dependent on the prevailing lighting conditions.
For example, on a dark overcast day, increase by 3 Stops to f/5.6.
With the aperture set for the prevailing conditions, the following rule applies:
The shutter speed will be the inverse of the ISO.
For example, for ISO 100, the shutter speed should be set to 1/100 second for the correct exposure.
This is a great rule of thumb to use as a starting point for getting the right exposure in different lighting conditions.
Get The Correct Exposure - Use A Light Meter For Cloudy Day Photography.
Ever heard of a light meter? Nope. Me either, until researching for this article. That’s because most modern cameras have one built in.
In fact, using a light meter is actually the most accurate way to expose a shot. There you go, you learn something new every day.
Whilst most digital cameras come with built in light meters, some conditions cause inaccuracies and cause an incorrect exposure.
Many of these conditions can occur when conducting cloudy day photography.
To make sure your exposure is correct, purchasing a reasonably priced light meter can be the difference between a great shot, and one that you’re trying to save in post-production because your exposure wasn’t correct.
If you’re using a flash, the camera exposures won’t be accurate either and this is a situation where a light meter is essential.
What's The Best ISO For Photography On A Cloudy Day?
When it comes to ISO, I try to use the lowest possible setting in all scenarios. The reason for this is because when you increase the ISO you introduce noise to the image.
Sometimes this can’t be helped during low light conditions, but I try to avoid increasing the ISO to capture the cleanest image possible.
If you have a modern camera, you can usually get away with increasing the ISO more than you could in older models without seeing too great a degradation.
This is especially true if you’ve paid for a high-end camera with a full frame sensor.
The post-production software available now also does an incredible job of removing noise with the noise reduction tool.
That being said, i wouldn’t adjust the ISO unless absolutely necessary. There are some situations where that can’t be helped though.
If you find yourself in one of those situations, try to increase the ISO as little as possible to reduce the amount of noise you inflict on the image, whilst still getting a good exposure. Using a tripod and keeping the shutter open for longer is often the best option in landscape photography, but we don’t always have that option.
Make sure you check the image to ensure it isn’t too noisy. If there is a large amount of noise, you may need to adjust your settings before re-shooting to avoid disappointment in post production.
You can also either use a light meter to get the correct ISO value, or failing that you can calculate it using an App such as Photopills.
What's The Best Aperture For Cloudy Day Photography?
Now you’re all experts in the Exposure Triangle, you’ll know that one of the factors to correctly exposing the shot is by getting the correct aperture.
As you would imagine, if you keep the ISO and shutter speed constant, you will need a slightly wider aperture when shooting on a cloudy day; a wider aperture means more light is exposed to the sensor to correctly expose the shot.
But wait there!
As always, in photography there are several factors are at play here – mainly what you’re shooting. Let me explain…
Adjusting the aperture may alter the amount of light which hits the sensor for a given shot, but it also adjusts the depth of field.
The larger the aperture (smaller number), the shallower the depth of field. This creates image blur in the background and foreground, known as bokeh.

Decreasing the aperture (larger number) increases the depth of field, and is used to ensure a razor sharp focus throughout the foreground and background elements of the shot. Landscape photographers use this a lot.
You may need to consider changing the shutter speed or ISO, if changing the aperture has unintended effects on your depth of field and composition.
Generally speaking, in Landscape Photography you can’t go wrong selecting a mid range aperture like f/8 or f/11.
That being said, always make use of the tools available to you such as the Histogram, Aps, and Light Meter.
Plan Your Shot - Use A Weather App With RADAR
The next tip is one of my favourite hacks and is one that I haven’t seen many other photographers speak about. It is also free, simple to use, and can help planning.
Many of us have simple weather apps on our phones but there are more sophisticated apps for weather available which provide more information, and it’s worth downloading one.
So why would I suggest this…after all most of us can just look outside of the window and see what the weather is doing.
Well, as I’ve alluded to, clouds can have an incredible impact on a shot.
From the wispy clouds that create stunning colours at sunset, to the grand cumulonimbus thunderstorm cells, clouds can add that special touch to your shot.
Cloudy Day Photography Using Windy...
So, we’ve established it may be better to have clouds in the shot, what is the best way to use this fancy weather app to plan the shot?
I personally use an app called Windy.
The best thing about this app is it has a feature to check the satellite image of the current cloud cover. Combine that with the wind forecast and you can make a good guess as to what the cloud clover is going to be like in your area at a given time.
You can also see forecasts for the cloud cover.
This is great, but why go through such lengths to check the weather and clouds?
Simply put, having an appreciation for the weather can help you plan for the conditions that you can expect on location, and not just whether you need to take a raincoat or not…
It's Not All About The Wind...

If however, the app is showing grey overcast skies with showers, I may make the decision to head in to the city for some cityscape photography.
I find shooting cities is better in overcast conditions sometimes – fewer shadows, and a softer glow as the city lights reflect off of the low cloud.
This is demonstrated, the the photo, right.
Maybe it is scattered cloud you’re after, which can illuminate your subject with the intense rays of sunshine breaking through the cloud.
For that, read on where we give you tips for catching those magical rays of light.
Planning your shot accordingly can seriously give you the edge, and put your in the right place, at the right time to get the perfect shot.
If you’ve been waiting for the perfect conditions to capture the bucket shot, this can greatly help with planning.
For example, I return often to some of my local favoured spots for photography.
I’ve shot some of the same subjects many times over the course of my photography journey as the weather and seasons add a different perspective.
If I look at Windy and see there is high level Cirrus cloud likely, I know there’s a good chance I may be treated to some unique and awesome shots, filled with a lush palette of colours.
You can see this looking at the cloud cover satellite, left. The cloud that night created stunning conditions for photographing lush pink skies.
But we’re not always treated to those conditions.
8 Cloudy Day Photography Ideas
If you’ve read this far, you’re in for a treat as we’re about to unleash some true value bombs.
So far, you’ve learned why a few pesky clouds shouldn’t cause you to pack your camera bag and go home. We’ve even shared some top-tips for how to shoot in cloudy conditions.
You’re in for a treat now, as we wrap this post up with 8 actionable cloudy day photography ideas which should prepare you for any condition you’re face with!
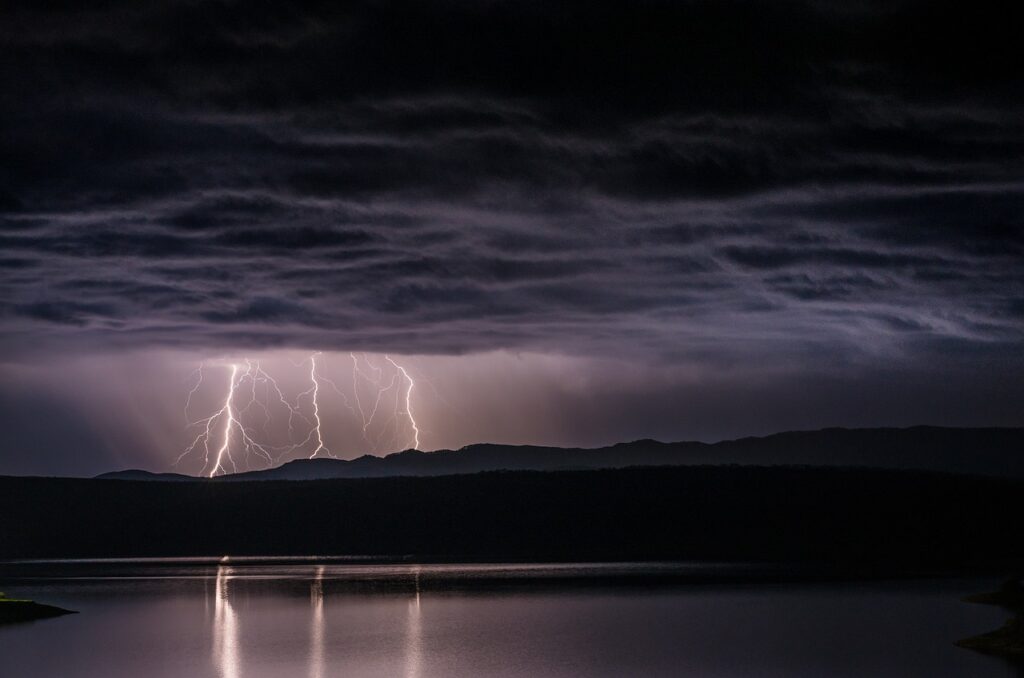
1) Cloudy Day Photography - Shooting Storm Clouds
Cloudy day photography isn’t always boring – especially when the clouds bring lightning.
This isn’t for the feint hearted though and catching a storm on film can be risky; mother nature isn’t a force to be reckoned with!
Capturing lighting can be a truly unique way to capture a landscape as every storm is different. It’s also a challenge to capture lightning as it can be so unpredictable and sporadic.
So how do you best capture a lightning storm?
Well, like most photography it involves planning and depends on the subject. I personally love capturing cityscapes during a lightning storm. Whatever the location, the conditions must be perfect for a storm.
That’s where knowing your location comes in to play. It can be easy to know what season a storm is most likely by doing a bit of simple research on the area and climate.
Once storm season hits, it’s a case of watching the weather. Remember the App mentioned in the previous section, Windy?
That’s also got a Weather Radar feature which shows you real time rainfall and storms, as well as lightning strikes.
Staying Safe Photographing Lightning...
This next bit is important, so pay attention. Make sure you track the storms path. I know it sounds like something out of Twister, but you’ll want to track the path of the storm for two reasons:
The first is to keep you safe. It’s not the best idea to be in the middle of the storm if you’re carrying a bunch of conductive equipment like a tripods.
Check out this guide on being safe near lightning. If you can track the storm, you’ll know when to pack up and leave.
Secondly, you aren’t going to get great content if a storm is directly overhead; you’ll likely be in the middle of a rainstorm with gusty winds and lightning.
To get the best shot’s you’ll want to capture with storm from a distance. Using the rainfall radar, combined with the wind and track of the storm will help you plan.
Getting The Shot...
Technically, there are a lot of challenges capturing lightning. Capturing the bolt of lightning, at the exact moment it strikes in sharp focus is only half of the battle.
The other half of the battle is capturing the storm with it correctly exposed.
Lightning produces a ton of light. Getting the correct exposure without overexposing is something even the most accomplished photographers find challenging!
Shooting at golden hour is usually the best compromise.
The ambient light won’t be so bright that you can’t make out the lightning, but also not so dark that the lightning overexposes the shot.
You’ll also have a good amount of light to capture any foreground elements, and will likely be treated to some amazing colours in the sky.
Photographing A Lightning Strike...
When it comes to capturing the lightning strike, there are a couple of options. The first is to set an interval timer and keep shooting in the direction of the storm.
I find, keeping the shutter open for about a second gives a good chance of capturing the lightning. The longer the shutter is open, the more chance of capturing the strike.
There are also lightning activated shutter triggers which can prove to be a good way of getting that perfect shot.
Check out this video of photographer Nick Page on his journey to capture lightning, and the challenges he encounters.
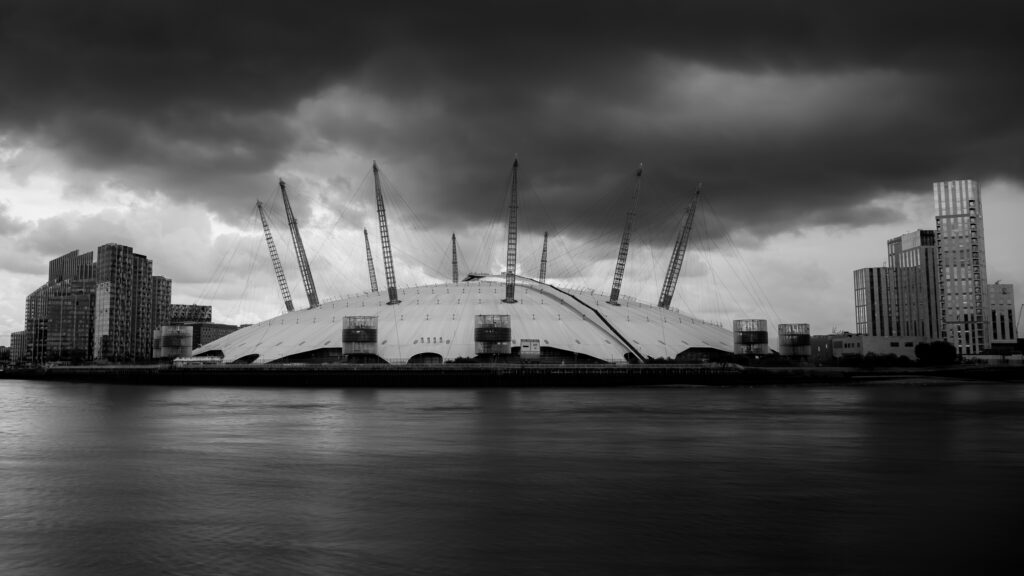
2) Consider B&W On A Cloudy Day
For those photography armatures out there, you may be surprised to learn the Black and White is still a popular style, even in 2022.
It is also a great style to keep in your photography locker when the clouds are dull and overcast.
Just by switching to Black and White you can turn a boring and otherwise emotionless shot into a tale of mystery and drama.
This was the case on a recent trip to London. I had my gear and was ready to shoot many of the iconic landscapes the city has to offer, but the weather wasn’t cooperating. A blanket of cloud had descended on the city.
As you can see, just by choosing Black and White, the tones in the clouds makes for a much more interesting and dynamic shot.
If you haven’t already, check out our Ultimate Guide to Black and White Landscape Photography for the best tips on how to achieve great Black and White shots!
3) Long Exposure Cloudy Day Photography
Number 3 on the list of actionable tips is consider long exposure as a technique. Why would you want to take a long expose of the clouds you ask…?
Good question.
Long exposures to add a sense of time to your image, and even a dreamy artistic touch.
When you open the shutter for a long exposure, the movement of the clouds is captured in the image as they move across the sky. This creates a kind of blurred effect, as seen below, and adds a sense of time.
This can be a particularly good option on a windy day when the clouds are fast moving. You’ll need to be cautious of what you select as a foreground subject…
The wind and the long exposure will also cause things like leaves on trees and grass to blur as it sways in the wind.
You can combat this by using a composite image. Here’s how…
Take two images, the first being the long exposure of the clouds. Now take another shot at a high shutter speed to capture the foreground element. Next use your post-processing software of choice to merge the images. Simple!

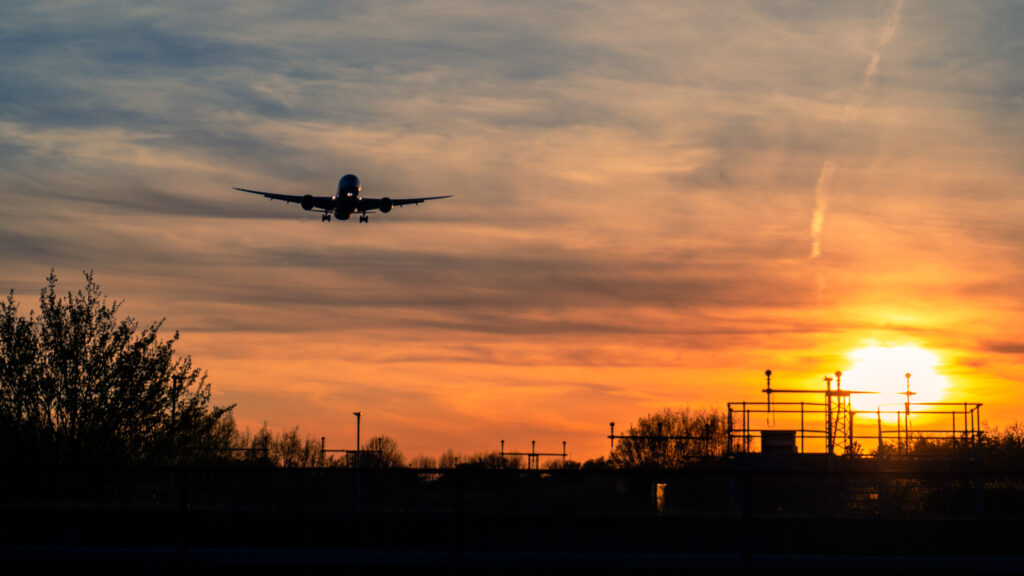
4) Use Rays Of Light To Add Drama On A Cloudy Day
Patience is the name of the game with idea number 4. This is one of my favourite tips for cloudy day photography!
It is a technique which can be used on a day when you’ve got scattered or broken amounts of cloud, and creates stunning results.
The idea of using rays of light involves waiting for the sunlight to break through the cloud which create epic rays of light shining on to the earth below.
Patience can be required though, as you’ll have to wait for the exact moment for the rays of light to appear.
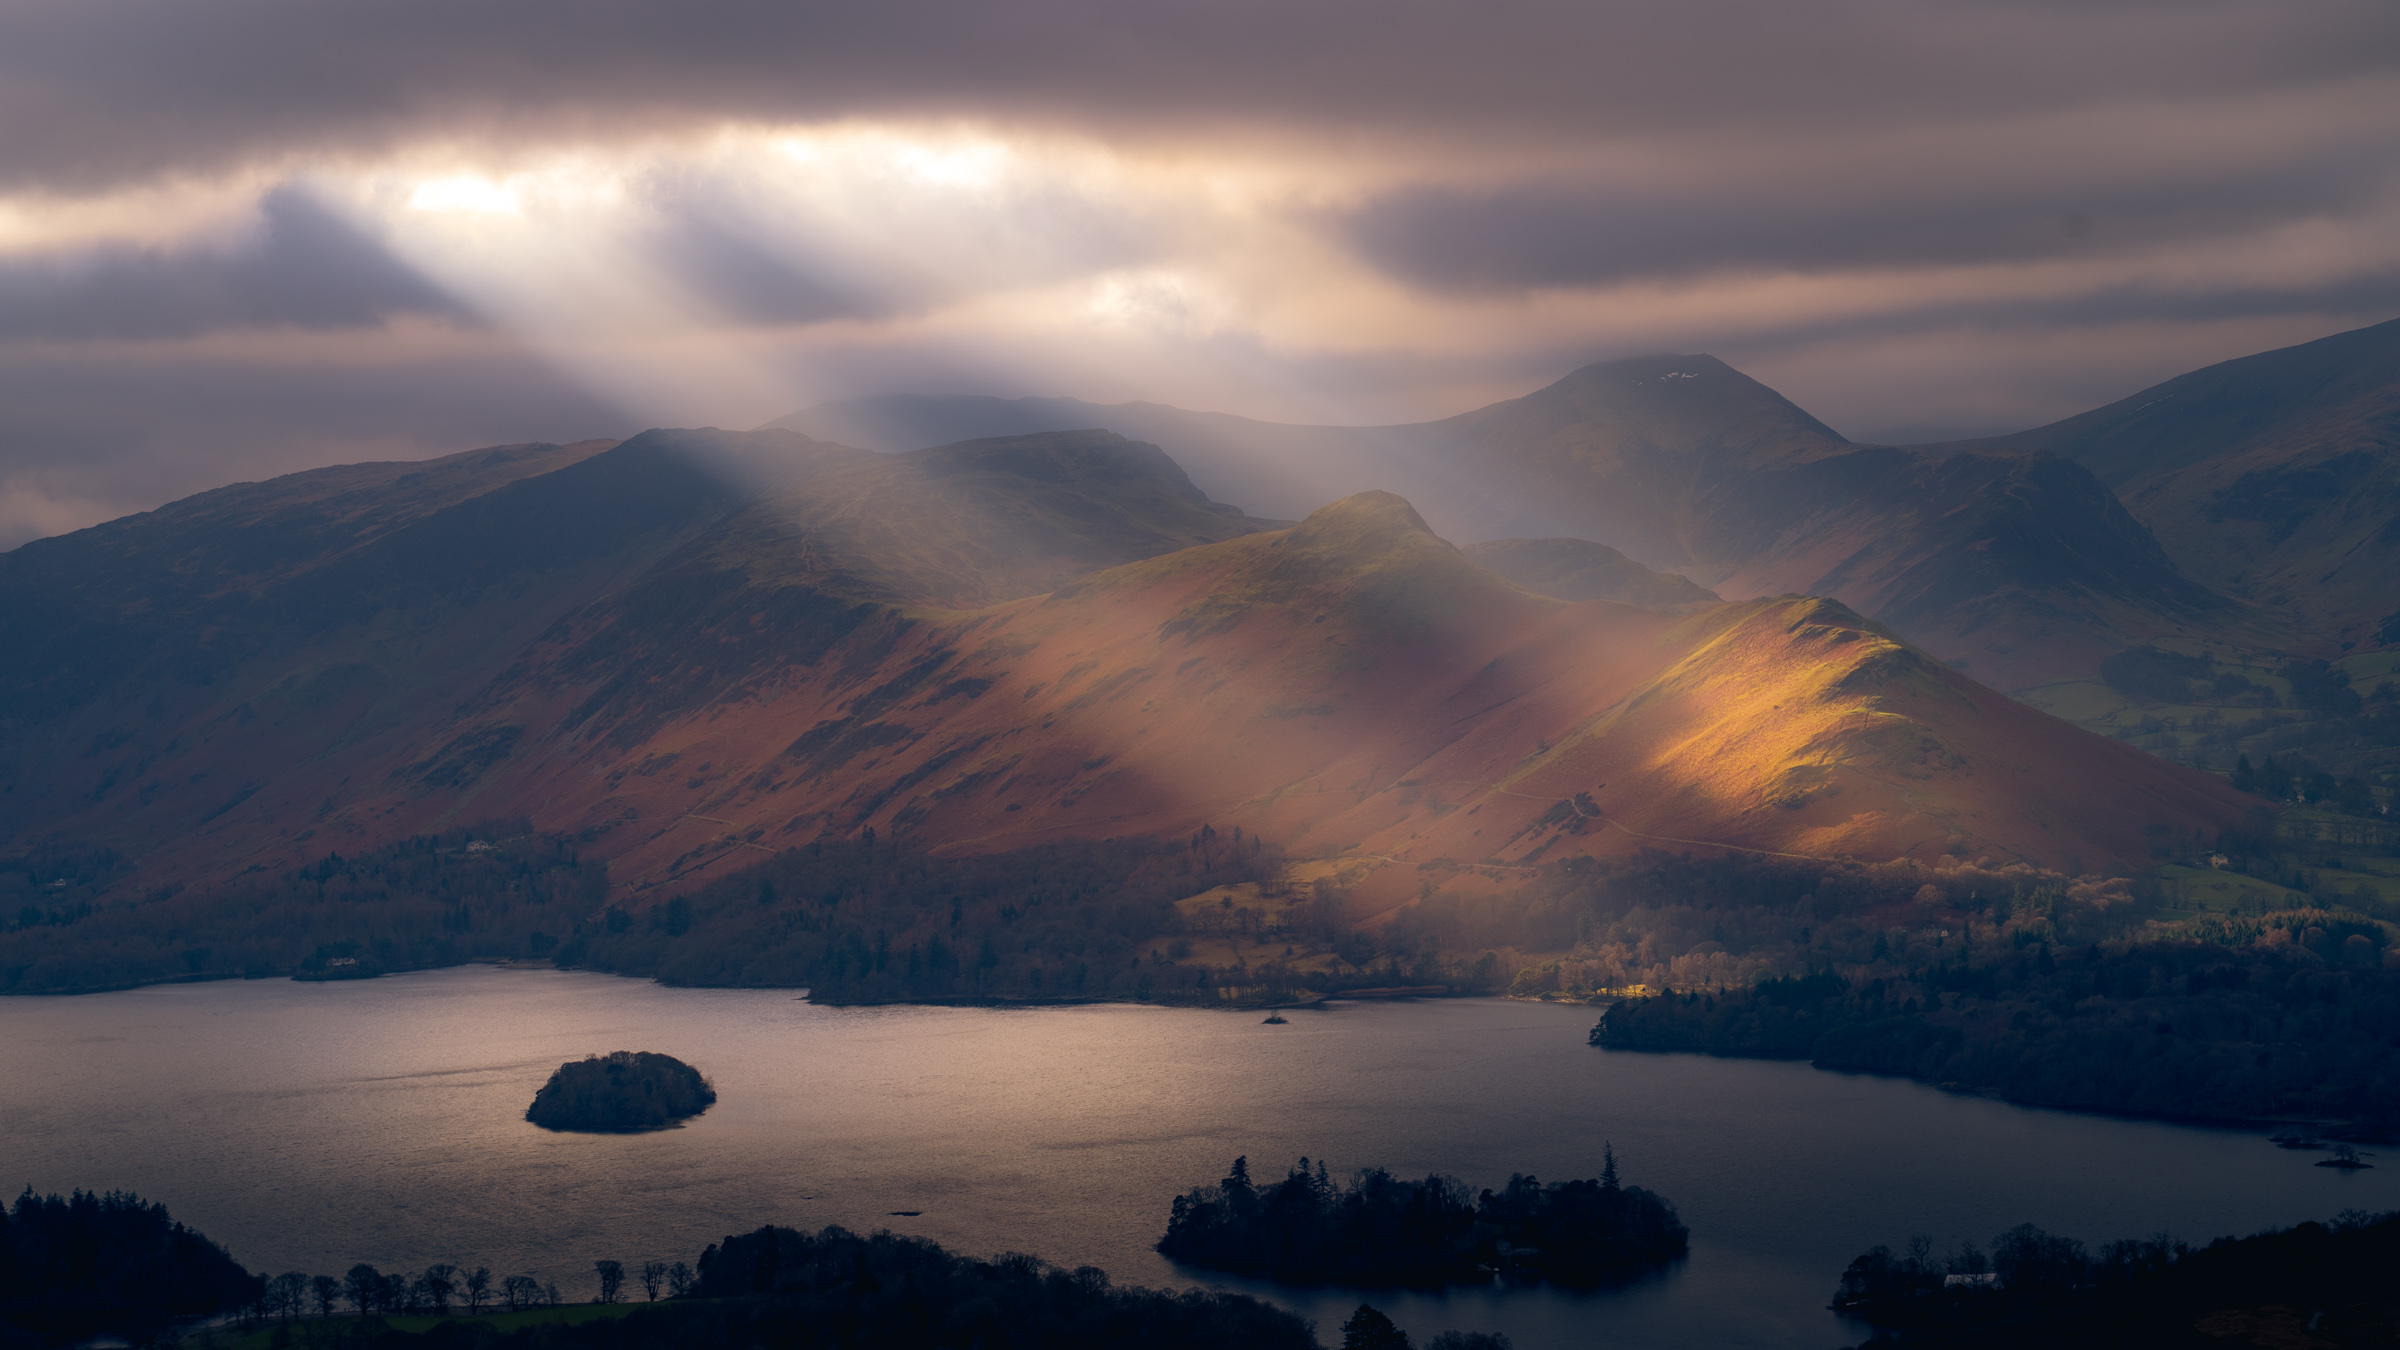
The more committed photographer will even wait for a ray of light the perfectly illuminates their subject to create the perfect shot.
I love how these shots turn out when viewed in black and white too…
The contrast of the bright light against the areas of shade creates a truly dramatic effect.
You can even add to the drama in post-production by using the brush tool to dodge and burn and really make those rays shine!
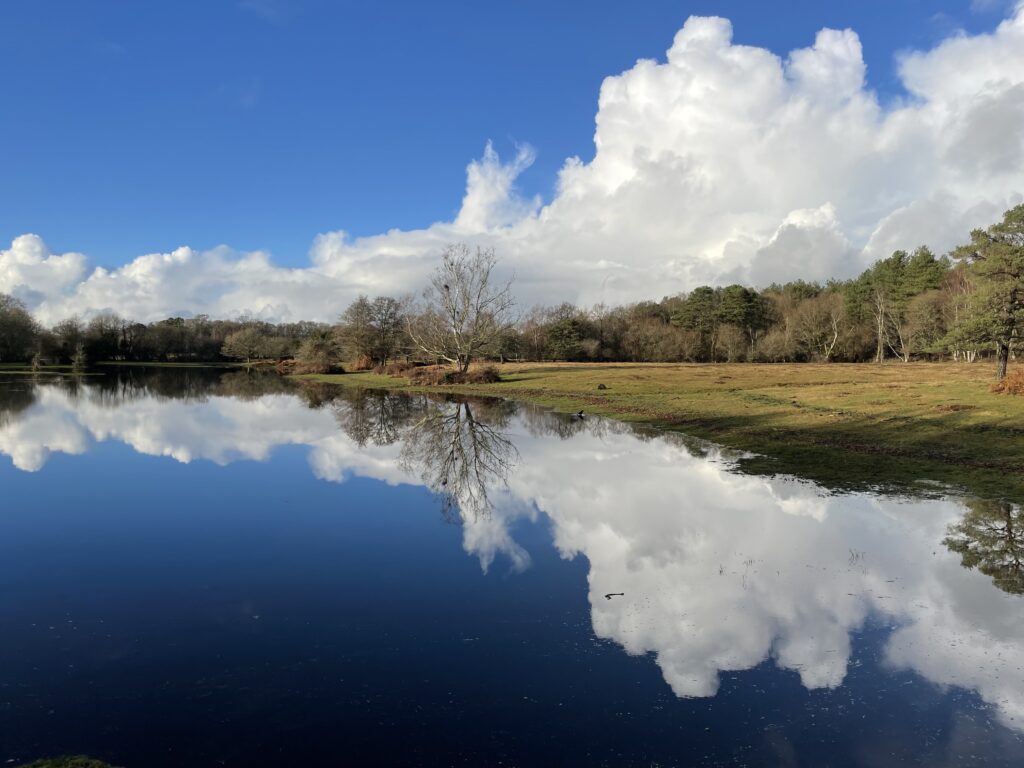
5) Consider Reflections When Photographing Clouds
Where there are clouds there is often rain! Whilst getting wet isn’t ideal, we can use the rain to our advantage with tip number 5!
One of my favourite composition techniques when it is cloudy is to look for reflections in either puddles, or water features such as lakes.
This may seem simple tip, but by bringing the reflection of the clouds into the shot adds a sense of symmetry to the image. A true fan favourite!
My favourite time of year for this is in the Autumn, as you can combine some of the epic colours of the sky with the crisp orange leaves.
Top tip – if the water is moving, use a ND filter to slow down the shutter speed. This will give a mirror like effect to the water and help with reflecting the clouds.
6) Use The Clouds As A Natural Diffuser To Shoot Portraits
Why not make the most of the diffused light to take some portraits?
The harsh light often experienced during a clear day is not ideal for taking portraits. You often get harsh shadows, which isn’t ideal when trying to take a portrait shot.
The clouds act as a natural diffuser, so when the cloud rolls in consider focussing more on a portrait subject and make the most of the softer light.
7) Isolate The Subject When It's Cloudy
Got a telephoto lens in your bag? Perfect.
Make the best use of it to get in close and isolate interesting elements of the Landscape. This is a technique I love when there is an overcast sky, with breaks in cloud and rays of light coming thorough.
Best of all…you eliminate the boring grey sky from the shot! Genius!
8) Cloudy Day Photography- Perfect For Minimalism
Oftentimes, there’s just no getting around it…
You’re on location and you’re greeted with an overcast sky. The cloud base may even be lowering with mist and fog rolling in.
This can seem boring and not something that piques your interest as a photographer, but there is a style of photography which lends itself to these conditions.
Those of you who follow Michael Kenna’s work will be familiar with his minimalist style. Some of the best opportunities for Minimalist Photography come on overcast days.
When there is no definition in the cloudy sky, it can look like a blank canvas.
There are times when this can be used as negative space to increase the emphasis on the subject and give a sense of minimalism to the shot.
I find the large featureless space can be used to create a sense of size – for example the more negative space you use, the smaller the subject will seem.
This can often give an effect of emotion of isolation or loneliness. That’s just one way this technique can be used to create stunning, emotion filled shots, even when the weather is poor.
Cloudy days are often great for producing great fine art in a minimalist style. For more information, check out our article on Fine Art Landscape Photography.

Wrapping It All Up - A Silver Lining
When the weather isn’t perfect, many photographers pack their bags and go home. But not you! Now that you’re armed with our top tips for cloudy day photography, you’ll get great results no matter what cloud you’re faced with.
To start, we explored whether cloudy days are good for photography and even discussed the best time to shoot.
The prudent amongst you will have filled your notebooks with our tips on how to shoot and correctly expose shots on a cloudy day.
We also treated you to a desert of 8 of the best ideas for cloudy day photography.
You should now have an arsenal full of techniques and ideas for whatever clouds you’re faced with!
I love bringing cloud into my photography. It may seem like such a simple thing, but I honestly believe clouds can make or break a shot.
As humans we often love clear cloudless conditions, but as a photographer cloud brings interest and drama to the shot.
Clouds do a great job of bringing a sense of time and emotion to a shot. For that reason I always consider the cloud conditions when shooting Fine Art Landscape Photography.
If you haven’t already, our guide to Fine Art Landscape Photography has actionable steps on how to get great results. It’s definitely worth checking out if you got value from this post.